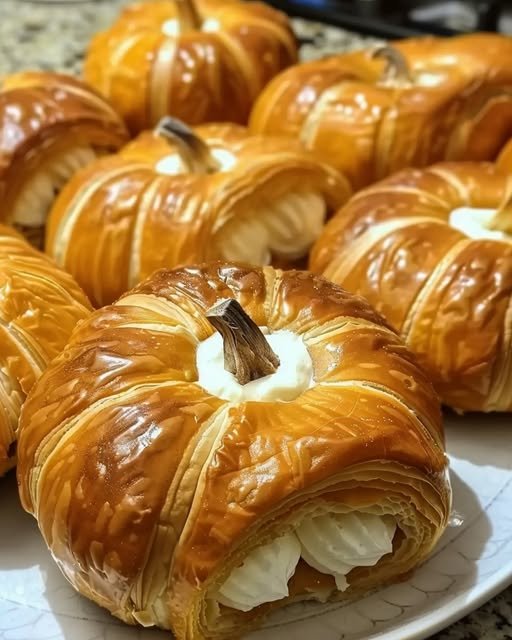
These Crescent Pumpkins create adorable fall-themed pastries by combining cream cheese and spiced pumpkin filling wrapped in crescent roll dough, then shaped to resemble miniature pumpkins. The recipe uses kitchen twine to create the characteristic pumpkin ridges during baking, resulting in pastries that are both visually appealing and delicious. The dual filling approach provides contrasting flavors and textures – tangy cream cheese balanced by sweet, spiced pumpkin.
The technique involves careful assembly to ensure proper sealing while creating the distinctive pumpkin shape through strategic twine placement. This creates an impressive presentation that belies the relatively simple preparation method.
Why You’ll Love This Recipe
Seasonal Visual Appeal – Creates authentic pumpkin appearance perfect for fall entertaining and holidays.
Dual Flavor Profile – Cream cheese provides tangy richness while pumpkin filling delivers classic autumn spices.
Individual Portions – Each pastry is perfectly sized for serving and portion control.
Impressive Presentation – Looks professionally crafted while using accessible ingredients and techniques.
Make-Ahead Friendly – Can be assembled in advance and baked when needed.
Creative Technique – The twine shaping method teaches an interesting pastry skill.
Ingredients You’ll Need
For the Dough Base:
- 8 oz refrigerated crescent rolls – provides convenient, flaky pastry foundation
For the Cream Cheese Filling:
- 5 oz softened cream cheese – creates tangy, rich contrast
- 2 tablespoons sugar – sweetens the cream cheese component
- 1 teaspoon vanilla extract – enhances the cream cheese flavor
For the Pumpkin Pie Filling:
- 3/4 cup pumpkin puree – provides authentic pumpkin flavor and color
- 1 tablespoon cornstarch – helps thicken the filling
- 2 tablespoons packed light brown sugar – adds molasses sweetness
- 2 tablespoons granulated sugar – contributes additional sweetness
- 3/4 teaspoon ground cinnamon – essential pumpkin pie spice
- 1/4 teaspoon ground ginger – adds warming notes
- 1/4 teaspoon nutmeg – contributes aromatic depth
- 1/8 teaspoon allspice – provides complexity
- 1 egg yolk – helps bind the filling
- 1/2 teaspoon vanilla extract – enhances overall flavor
For Finishing:
- 2 1/2 tablespoons melted butter – creates golden, glossy finish
- Pretzel sticks for stems – adds authentic pumpkin appearance
Step-by-Step Instructions
Prepare the Pumpkin Base
Place pumpkin puree on paper towels to remove excess moisture, which prevents soggy pastry. Preheat oven to 375°F (190°C) and line a baking sheet with parchment paper.
Create the Fillings
Combine drained pumpkin, egg yolk, both sugars, cornstarch, all spices, and vanilla extract in one bowl. In another bowl, blend softened cream cheese, sugar, and vanilla until completely smooth.
Prepare the Dough
Unroll crescent dough into four rectangles, sealing the perforations to create solid pieces. Cut each rectangle into 8 squares for a total of 32 squares.
Assemble the Pastries
Spoon 1 tablespoon of cream cheese filling and 1 tablespoon of pumpkin filling onto each dough square. Pinch edges together carefully to form sealed balls.
Shape the Pumpkins
Wrap each dough ball with kitchen twine to create pumpkin segments, ensuring the twine creates distinct ridges. Place seam-side down on the prepared baking sheet.
Bake and Finish
Brush with melted butter and bake for 18-22 minutes until golden brown. Once cooled, carefully remove twine and insert pretzel sticks as stems.
Recipe Notes & Tips
Moisture Management – Draining pumpkin puree prevents soggy pastry bottoms.
Sealing Technique – Pinch dough edges firmly to prevent filling leakage during baking.
Twine Application – Wrap firmly but not so tight that it cuts through the dough.
Cooling Importance – Allow complete cooling before removing twine to maintain shape.
Stem Timing – Add pretzel stems after baking to prevent burning.
Nutritional Information
- Prep Time: 25 minutes
- Bake Time: 20 minutes
- Total Time: 45 minutes
- Yield: 32 mini pumpkins
- Seasonal treat intended for special occasions
Perfect Pairings
Seasonal Beverages – Apple cider, pumpkin spice lattes, or warm tea complement the autumn flavors.
Fall Presentations – Arrange on platters with autumn leaves or mini gourds for seasonal appeal.
Temperature Service – Delicious both warm and at room temperature.
Party Integration – Works well as part of larger fall dessert spreads.
Ideal Occasions
Fall Gatherings – Perfect for harvest parties, Halloween events, or Thanksgiving celebrations.
Bake Sales – Eye-catching appearance and individual portions make them ideal for fundraising.
Seasonal Entertaining – Impressive enough for hosting while being approachable to prepare.
Gift Giving – Package attractively for seasonal food gifts to neighbors or friends.
Storage & Serving Tips
Day-of Preparation – Best consumed within 24 hours of baking for optimal texture.
Storage Method – Keep covered at room temperature for same-day service.
Make-Ahead Strategy – Can be assembled and refrigerated before baking.
Presentation Enhancement – Dust with powdered sugar or arrange on seasonal serving dishes.
Creative Variations to Try
Filling Modifications – Try different spice combinations or add mini chocolate chips to pumpkin filling.
Shape Alternatives – Create other fall shapes like leaves or acorns using the same technique.
Glaze Options – Brush with simple powdered sugar glaze for extra sweetness.
Size Variations – Make larger versions for individual dessert portions.
Troubleshooting Common Issues
Filling Leakage – Ensure proper sealing and don’t overfill the dough squares.
Twine Marks – Remove carefully while pastries are completely cool.
Uneven Browning – Rotate baking sheet halfway through cooking time.
Soggy Bottoms – Ensure pumpkin is well-drained and use parchment paper.
Why This Recipe Works
These pumpkin pastries succeed because they balance technical achievement with practical execution. The dual filling approach creates flavor complexity while the shaping technique produces impressive visual results. The use of refrigerated dough makes the recipe accessible while still teaching valuable pastry skills.
The seasonal theme makes them particularly appealing during fall months while the individual portion format ensures easy serving.
Final Thoughts
This recipe demonstrates how creative presentation can elevate simple ingredients into something special. The combination of familiar flavors with innovative shaping creates pastries that feel both nostalgic and new.
While the technique requires some patience and attention to detail, the results justify the effort by producing bakery-quality appearance with homemade satisfaction. These pastries represent the kind of seasonal baking that creates lasting memories around holiday tables.