
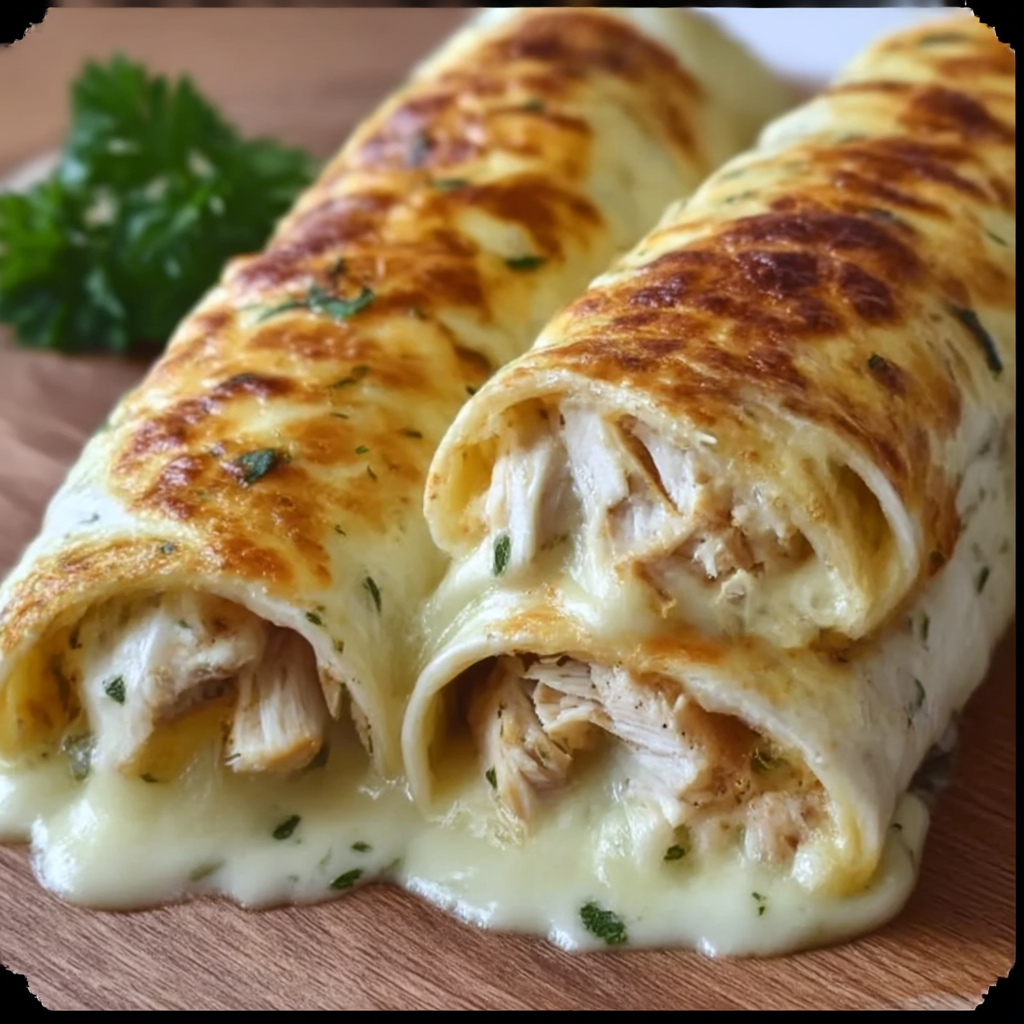
Cheesy garlic chicken wraps bring together juicy shredded chicken and a variety of cheeses, tucked into soft flour tortillas. Each wrap is coated in a fragrant blend of melted butter, minced garlic, and herbs before pan-toasting or oven-baking until golden and crispy. The result is a comforting handheld dish with melty cheese and tender meat in every bite, capped with a rich garlicky aroma.
These wraps have become a go-to solution for quick weeknight dinners and easy lunches because they deliver serious comfort food satisfaction without much fuss. The combination of three different cheeses creates an irresistible gooey texture, while the garlic butter coating ensures a perfectly crispy exterior that contrasts beautifully with the creamy interior. Whether you’re using leftover chicken or starting fresh, these wraps transform simple ingredients into something special.
Why You’ll Love These Wraps
30-Minute Comfort Food – Ready in less than half an hour using simple ingredients you likely have on hand.
Triple Cheese Indulgence – Mozzarella, cheddar, and Parmesan create the perfect balance of stretch, sharpness, and savory depth.
Versatile Protein Base – Works perfectly with rotisserie chicken, leftover roasted chicken, or freshly cooked breast meat.
Universal Appeal – Kid-friendly flavors that adults love too, making it perfect for family meals.
Crispy-Creamy Contrast – The garlic butter coating creates a golden, crispy exterior that gives way to melty cheese and tender chicken.
Meal Prep Friendly – Can be assembled ahead and stored for quick reheating throughout the week.
Ingredients You’ll Need
For the Filling:
- 480g cooked chicken breast, shredded or diced – provides hearty protein base (rotisserie chicken works perfectly)
- 110g shredded mozzarella cheese – delivers signature stretchy, gooey texture
- 60g shredded cheddar cheese – adds sharp flavor and rich color
- 20g grated Parmesan cheese – contributes savory depth and umami notes
- 4 large flour tortillas – provides flexible, sturdy wrapping base
For the Garlic Butter Coating:
- 45g unsalted butter, melted – creates rich, golden coating
- 2 cloves garlic, minced – infuses wraps with aromatic, savory goodness
- 1 teaspoon dried parsley – adds color and mild herb flavor
Step-by-Step Instructions
Prepare the Filling
In a large mixing bowl, combine shredded chicken, mozzarella, cheddar, and Parmesan cheeses. Mix thoroughly until all cheese is evenly distributed and the chicken is well coated. The mixture should look cohesive and well-blended.
Assemble the Wraps
Place a tortilla flat on your work surface. Spoon about 120g of filling into the center of the tortilla. Fold the sides inward toward the middle, then roll tightly from bottom to top, creating a secure burrito shape. This prevents filling from leaking during cooking. Repeat with remaining tortillas and filling.
Create the Garlic Butter
In a small bowl, combine melted butter with minced garlic and dried parsley. Stir until the garlic and herbs are evenly suspended throughout the butter.
Pan-Sear Method
Preheat a skillet or griddle over medium heat. Brush the outside of each wrap thoroughly with garlic butter. Place wraps seam-side down and cook for 2-3 minutes per side until both sides are golden brown and crispy. The garlic butter helps create a beautiful golden crust.
Oven-Baking Alternative
Preheat oven to 190°C (375°F). Brush wraps with garlic butter and arrange seam-side down on a parchment-lined baking sheet. Bake for 10-12 minutes, flipping halfway through, until lightly crisp and thoroughly heated.
Serve Hot
Enjoy wraps while piping hot for the best melted cheese experience. Serve with favorite dipping sauces like ranch, marinara, or creamy garlic aioli.
Recipe Notes & Tips
Tight Rolling Technique – Roll wraps as tightly as possible to prevent cheese and chicken from escaping during cooking.
Filling Distribution – Don’t overstuff tortillas, as this can cause tearing. Save extra filling for mini quesadillas.
Garlic Butter Application – Brush thoroughly for maximum flavor and optimal crisping.
Cooking Method Choice – Both pan-searing and oven-baking work well; choose based on your preference and equipment.
Seam-Side Down – Always start cooking with the seam against the pan to help seal the wrap closed.
Nutritional Information
- Prep Time: 20 minutes
- Cook Time: 15 minutes
- Total Time: 35 minutes
- Servings: 4 wraps
- Difficulty: Intermediate
Perfect Pairings
Crisp Green Salad – Light, fresh greens provide a refreshing contrast to the rich, cheesy wraps.
Tomato Soup – Classic combination that echoes the comfort food theme perfectly.
Roasted Vegetables – Simple sides like carrots or broccoli add nutrition and color.
Fresh Fruit – Crisp apples or grapes cleanse the palate between rich bites.
Pickles – Tangy acidity cuts through the richness beautifully.
Ideal Occasions
Busy Weeknight Dinners – Quick enough for hectic schedules while feeling special and satisfying.
Casual Lunch Gatherings – Easy to share and eat without formal place settings.
Game Day Snacks – Cut into rounds with toothpicks for party-style appetizers.
Kids’ Meals – Familiar flavors that appeal to young palates while being substantial.
Meal Prep Sessions – Excellent for preparing multiple meals ahead of time.
Storage & Reheating Tips
Refrigerator Storage – Keep in airtight containers for up to 3 days.
Optimal Reheating – Use skillet or oven rather than microwave to maintain crispiness.
Freezing Instructions – Cool completely, wrap tightly in foil, and freeze for up to 2 months.
Make-Ahead Strategy – Assemble wraps without cooking and refrigerate until ready to prepare.
Creative Variations to Try
Protein Swaps – Use turkey, shredded pork, or even seasoned ground meat for different flavors.
Vegetarian Option – Replace chicken with sautéed mushrooms and spinach for plant-based version.
Cheese Combinations – Try Monterey Jack, Swiss, or any good melting cheese you have available.
Flavor Additions – Include caramelized onions, roasted peppers, or herbs for extra complexity.
Spice Level – Add black pepper, chili flakes, or hot sauce for those who enjoy heat.
Troubleshooting Common Issues
Filling Spillage – Ensure wraps are rolled tightly and not overstuffed.
Uneven Browning – Maintain consistent medium heat and flip carefully.
Soggy Texture – Pat chicken dry before using and don’t skip the garlic butter coating.
Tough Tortillas – Use fresh, pliable tortillas and warm them slightly before rolling if needed.
Why This Recipe Works
These Cheesy Garlic Chicken Wraps succeed because they balance multiple textures and flavors while using a foolproof technique. The combination of three cheeses ensures both flavor complexity and optimal melting, while the garlic butter coating creates the perfect crispy exterior that contrasts with the creamy interior.
The method accommodates both stovetop and oven cooking, making it adaptable to different kitchen setups and preferences while consistently delivering satisfying results.
Final Thoughts
These wraps represent the perfect fusion of comfort food appeal with practical convenience. They prove that satisfying meals don’t require complicated techniques or exotic ingredients—sometimes the best results come from combining familiar flavors in thoughtful ways that maximize both taste and texture.
Whether you’re feeding a family on a busy weeknight or looking for a crowd-pleasing lunch option, these wraps deliver the kind of comfort food satisfaction that creates happy moments around the table.